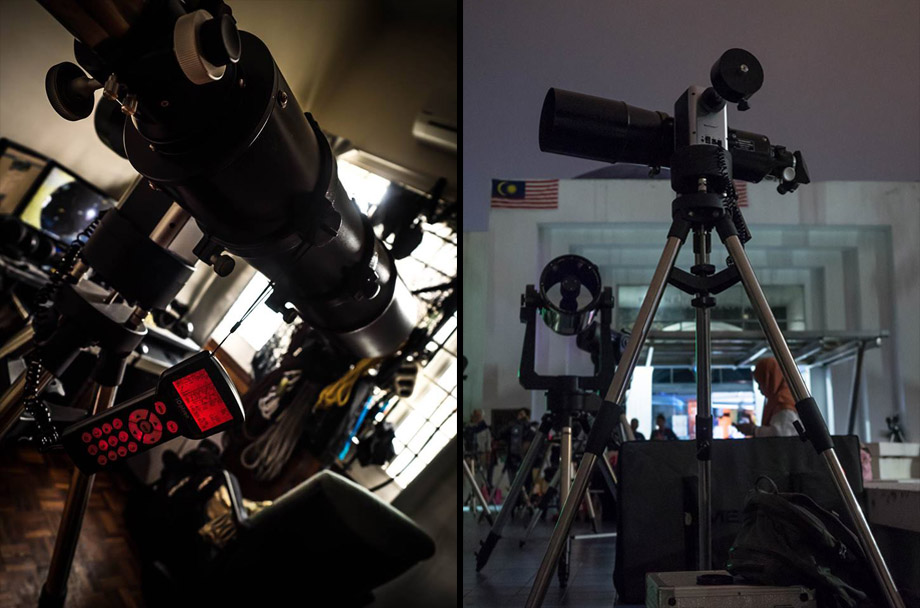
Computer controlled OTA and DSLR
Orion SpaceProbe 130ST
Entry 01 : Problem Identification
 Issue #1 : Issues with the GoToNova hand controller that is supplied with the MiniTower. Red backlight on the screen remains on but the information that is displayed tends to be somewhat intermittent. Unplugging and plugging in the connector cable occasionally helps but the issue normally will reoccur shortly after. I plan to open the back cover of the GoToNova Hand Controller again and try to reinforce the ribbon connector once again. I should be able to gently pull back the two grey/black tabs on either side of the ribbon cable connector in order to remove it. I'll then be able to reseat the ribbon once again by pushing down the grey tabs.
Issue #2 : Two of the legs in the stand can't be extended for some reason probably due to being in storage for a long duration. Initially thought that this was caused by a fusing of the joints due to heat since part of the outer layer seems to be coated with rubber, but found that this was not so once the joints were separated with my knife. Seems that the issue lies within the legs themselves. Nothing that good old WD40 can't fix hey?
Issue #3 : I will need to obtain a finder scope and an eyepiece set for the telescope.. or will I? A finder scope may not be required if the OTA and the GoToNova Hand Controller are able to be remotely controlled from a computer (as long as OTA alignment is not an issue) and a set of eyepieces are not required if I instead connect my DSLR to the diagonal and use it as prime focus. The liveview on the D90 is nothing great so will also need to establish a feed from the camera that runs back to the computer for image stacking using DSS. Magnification will still be an issue though as the focal length of the telescope is only 750mm.
Issue #1 : Issues with the GoToNova hand controller that is supplied with the MiniTower. Red backlight on the screen remains on but the information that is displayed tends to be somewhat intermittent. Unplugging and plugging in the connector cable occasionally helps but the issue normally will reoccur shortly after. I plan to open the back cover of the GoToNova Hand Controller again and try to reinforce the ribbon connector once again. I should be able to gently pull back the two grey/black tabs on either side of the ribbon cable connector in order to remove it. I'll then be able to reseat the ribbon once again by pushing down the grey tabs.
Issue #2 : Two of the legs in the stand can't be extended for some reason probably due to being in storage for a long duration. Initially thought that this was caused by a fusing of the joints due to heat since part of the outer layer seems to be coated with rubber, but found that this was not so once the joints were separated with my knife. Seems that the issue lies within the legs themselves. Nothing that good old WD40 can't fix hey?
Issue #3 : I will need to obtain a finder scope and an eyepiece set for the telescope.. or will I? A finder scope may not be required if the OTA and the GoToNova Hand Controller are able to be remotely controlled from a computer (as long as OTA alignment is not an issue) and a set of eyepieces are not required if I instead connect my DSLR to the diagonal and use it as prime focus. The liveview on the D90 is nothing great so will also need to establish a feed from the camera that runs back to the computer for image stacking using DSS. Magnification will still be an issue though as the focal length of the telescope is only 750mm.
Issue #4 : Computer doesn't detect the OTA despite the USB connector from the GoToNova Hand Controller having already been plugged in.
Entry 02 : DSLR
 I was pleasantly surprised that the T-ring (Nikon 1.25" T-ring) for my Nikon D90 screwed right into the diagonal prism that is connected to the telescope focuser and that the D90 could be attached for prime focus photography without the need for a T-adapter. Still unsure if the focusing tube has the required length for prime focus (as was the case with the Orion SpaceProbe 130ST) but if so, could possibly be remedied with a 2x Barlow. Problem here is that the T-ring will not connect directly to the Barlow which would mean that a T-adapter will be needed anyway.
Another concern is the additional weight once the DSRL is attached as prime focus. The OTA was already bottom-heavy due to the large star diagonal that was already attached. Normally the off-axis loads are counterbalanced by shifting the attachment point of the OTA with the mount. Problem is the attachment point on the OTA itself is not long enough to do this. This will mean that the OTA may not be entirely stable on the altitude axis and may have to work a bit harder when rotating due to the effects of gravity. I will have to look into a permanent fix for this at some point in the future (anticipating this to be somewhat costly). Since the MiniTower is an Alt-Azimuth mount, counterbalancing on the second axis is also required but this can easily be achieved using the counterbalancing weight provided (or a secondary telescope if attached).
*I will still need to look into getting an extension tube for eyepiece projection setup at a later date once the eyepiece set and a 2x Barlow have been purchased.
I was pleasantly surprised that the T-ring (Nikon 1.25" T-ring) for my Nikon D90 screwed right into the diagonal prism that is connected to the telescope focuser and that the D90 could be attached for prime focus photography without the need for a T-adapter. Still unsure if the focusing tube has the required length for prime focus (as was the case with the Orion SpaceProbe 130ST) but if so, could possibly be remedied with a 2x Barlow. Problem here is that the T-ring will not connect directly to the Barlow which would mean that a T-adapter will be needed anyway.
Another concern is the additional weight once the DSRL is attached as prime focus. The OTA was already bottom-heavy due to the large star diagonal that was already attached. Normally the off-axis loads are counterbalanced by shifting the attachment point of the OTA with the mount. Problem is the attachment point on the OTA itself is not long enough to do this. This will mean that the OTA may not be entirely stable on the altitude axis and may have to work a bit harder when rotating due to the effects of gravity. I will have to look into a permanent fix for this at some point in the future (anticipating this to be somewhat costly). Since the MiniTower is an Alt-Azimuth mount, counterbalancing on the second axis is also required but this can easily be achieved using the counterbalancing weight provided (or a secondary telescope if attached).
*I will still need to look into getting an extension tube for eyepiece projection setup at a later date once the eyepiece set and a 2x Barlow have been purchased.
Entry 03 : GoToNova Controller
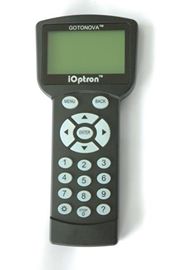 I thought that there was a chance that the issue that I was facing with the GoToNova could be overcome with a simple firmware update and figured that there really wasn't any harm in doing so (as long as I got the right version and make of the controller matched correctly).
I managed to fix this by going to iOptron's website, selecting the 'support' option at the top of the page, and then choosing the 'MiniTower/MiniTower II/MiniTower Pro' category. The USB2COM driver was at the top of the list and I chose the first one (CP2102) since I am running a 32-bit OS. I then went to the Device Manager to verify that everything was installed correctly (was using COM5 - COM is basically the name given to a serial port that will refer to the virtual port that is created by the USB-to-Serial adapters).
I then went back to the iOptron software/firmware update page, chose the category 'MiniTower 8401 hand controller firmware' and downloaded both the 'iOptron Downloader 2.01' as well as 'MT 8401 HC firmware (Ver090701)'. Launching the iOptron Downloader, choosing the right serial port and selecting the firmware version was very straightforward but I had issues after that as I needed to reset the GoToNova Controller and this could only be done through the Controllers interface (which is what I was having issues with). Ended up obtaining the manual for the controller and navigated the menus by just using the directional pads and listening to the beeps.
Once the dust had settled and to my dismay, I found that the firmware update had not fixed the issue meaning that the source had to be hardware related. Time to fiddle with the ribbon connectors!
I thought that there was a chance that the issue that I was facing with the GoToNova could be overcome with a simple firmware update and figured that there really wasn't any harm in doing so (as long as I got the right version and make of the controller matched correctly).
I managed to fix this by going to iOptron's website, selecting the 'support' option at the top of the page, and then choosing the 'MiniTower/MiniTower II/MiniTower Pro' category. The USB2COM driver was at the top of the list and I chose the first one (CP2102) since I am running a 32-bit OS. I then went to the Device Manager to verify that everything was installed correctly (was using COM5 - COM is basically the name given to a serial port that will refer to the virtual port that is created by the USB-to-Serial adapters).
I then went back to the iOptron software/firmware update page, chose the category 'MiniTower 8401 hand controller firmware' and downloaded both the 'iOptron Downloader 2.01' as well as 'MT 8401 HC firmware (Ver090701)'. Launching the iOptron Downloader, choosing the right serial port and selecting the firmware version was very straightforward but I had issues after that as I needed to reset the GoToNova Controller and this could only be done through the Controllers interface (which is what I was having issues with). Ended up obtaining the manual for the controller and navigated the menus by just using the directional pads and listening to the beeps.
Once the dust had settled and to my dismay, I found that the firmware update had not fixed the issue meaning that the source had to be hardware related. Time to fiddle with the ribbon connectors!
Entry 04 : Stellarium
Entry 05 : Bahtinov mask
 During the last stargazing session, I realized that the live view on the D90 was not sensitive enough to support real-time focusing. To get around this, I will most likely need to resort to making a Bahtinov mask and shoot continuous exposures using something like MaximDL or Nebulosity. Further testing with the DSLR controls will need to be done once MaximDL or Nebulosity have been installed on the computer.
* The vector template for a 150mm aperture and 750mm focal length OTA has already been generated.
During the last stargazing session, I realized that the live view on the D90 was not sensitive enough to support real-time focusing. To get around this, I will most likely need to resort to making a Bahtinov mask and shoot continuous exposures using something like MaximDL or Nebulosity. Further testing with the DSLR controls will need to be done once MaximDL or Nebulosity have been installed on the computer.
* The vector template for a 150mm aperture and 750mm focal length OTA has already been generated.
Entry 06 : Ribbon Connector
Entry 07 : Stellarium Navigation
Entry 08 : Crayford Focuser
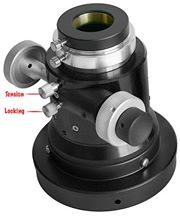 Identified another issue but fixed it within minutes. I found that the 2 speed 2" Crayford focuser that is attached to the Dielectric Star Diagonal was sliding out of focus very easily and tended to do this when aimed at locations with high inclinations or that were located close to the Zenith. This was probably exacerbated by the additional weight of the DSLR that was attached to the 2" to 1.25" eyepiece adapter. The issue was easily remedied by tightening and loosening the Tension and Locking bolts on the underside of the Crayford focuser accordingly.
So, to recap :
Issue #1 - Fixed
Issue #2 - Unresolved
Issue #3 - In Process
Issue #4 - Fixed
Issue #5 - Fixed
Entry 09 : MaxIm DL
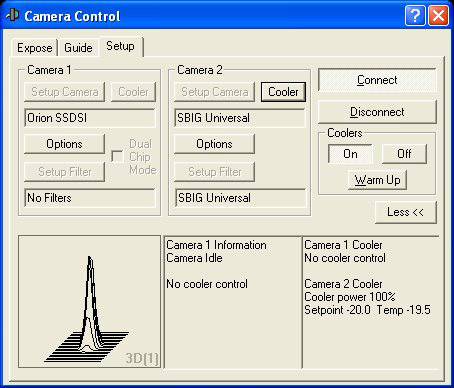 Exposure settings were found under the 'Expose' tab. Planning to focus on celestial objects by taking continuous exposures every few seconds and making slight adjustments to the focus depending on how the three angled diffraction spikes line up using the Bahtinov mask. The Bahtinov method should be an easier, faster and more accurate way to achieve perfect focus if compared to the focus statistics that MaxIm DL generates for each exposure. These focus statistics are based on the maximum pixel value (Max), the full width half maximum (FWHM), and the half flux diameter (1/2 FD) and the focus can be adjusted based on these variables.
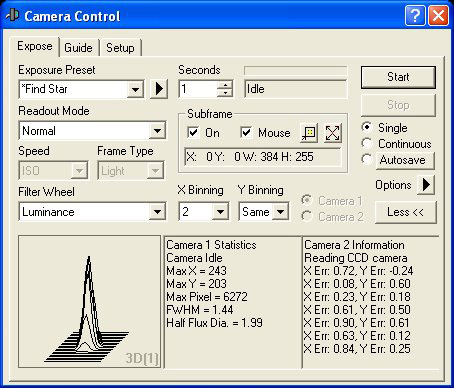 Another useful option that I encountered was the 'subframe' option. This basically lets you see just a selected portion of the sensor frame. Using this option will end up speeding up the download during the focusing itself as well as helps isolate the target (the star) that is being used.
* I will need to test the auto guider abilities of MaxIm DL as well as how well it stacks exposures.
* I will also need to look into powering the Nikon D90 from an external power adapter. This is just to ensure a continuous use with no risk of the battery discharging.
Another useful option that I encountered was the 'subframe' option. This basically lets you see just a selected portion of the sensor frame. Using this option will end up speeding up the download during the focusing itself as well as helps isolate the target (the star) that is being used.
* I will need to test the auto guider abilities of MaxIm DL as well as how well it stacks exposures.
* I will also need to look into powering the Nikon D90 from an external power adapter. This is just to ensure a continuous use with no risk of the battery discharging.
Entry 10 : Tripod
Entry 11 : Stargazing Attempt 1
Entry 12 : Bahtinov mask completed
Entry 13 : Eyepieces
 Finally completed my full set of eyepieces! Managed to procure a 4mm, 6.5mm, 10mm, 15mm, 25mm, and a 40mm which will end up giving a magnification from 18.75x all the way up to 187.5x. Also scrapped the idea of a finderscope as the low magnification given by the 40mm should suffice to give a view wide enough for region location.
Entry 14 : Dismantling